In this post I explain how to create a .NET Core 2.0 console application which reads, and writes, data from MySQL, and uses Entity Framework Core, and migrations, in order to persist data and manage the DB schema. Furthermore I will show how to use Docker to be able to develop the application independently by the chosen environment.
In order to highlight the needed steps, I split the post in this way:
- creation of the .NET Core 2.0 console project with Docker support;
- addition of a MySQL container in order to manage persistence;
- creation of a data model, and the needed configurations, to persist it through Entity Framework Core;
- initialization of the DB schema with a SQL script;
- implementation of a sample application in order to verify that the system is working;
- usage of migrations to initialize the DB schema instead of the SQL script;
Project creation
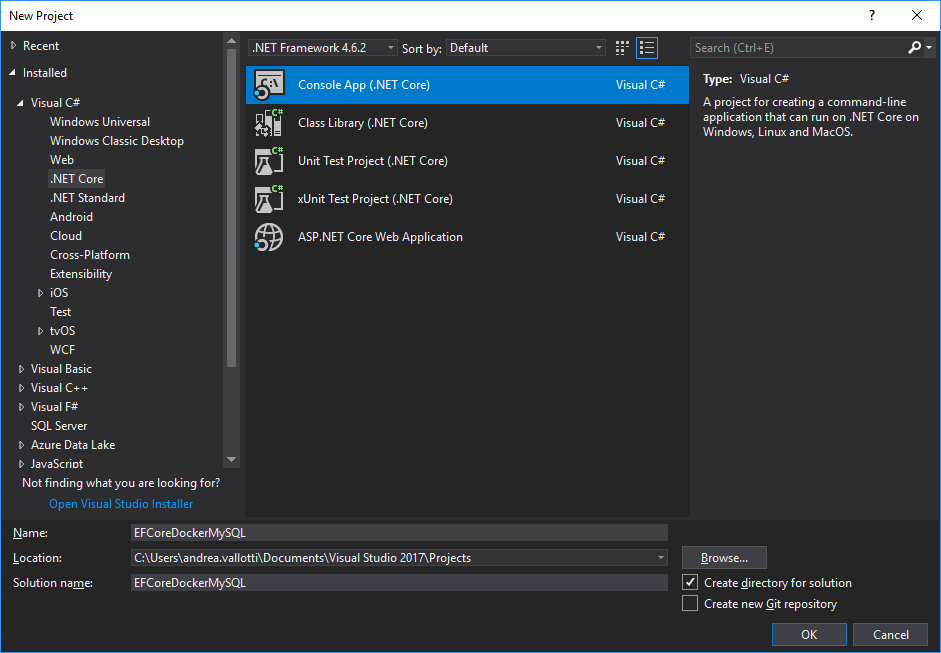
First of all I created a new Console App (.NET Core) project (File -> New -> Project…) with Visual Studio.

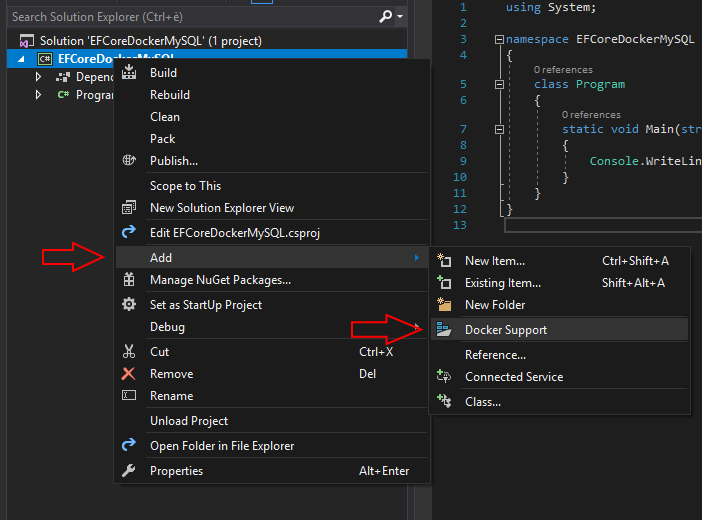
Then I enabled the Docker support by right clicking on the project, selecting Add -> Docker Support, and choosing Linux ad target OS.

Doing that VS adds Dockerfile and .dockerignore files to the application project,
and a new docker-compose project to the solution.
The Dockefile describes how the application container will be created.
1
2
3
4
5
FROM microsoft/dotnet:2.0-runtime
ARG source
WORKDIR /app
COPY ${source:-obj/Docker/publish} .
ENTRYPOINT ["dotnet", "EFCoreDockerMySQL.dll"]
source parameter used by the COPY command, which will be actualized during container
building, defines which folder of the host filesystem containing the application
have to be copied in the container. This variable allows to specify different behaviors
whether the application is executed in release or debug mode.
.dockerignore file instructs Docker on which part of the host filesystem, based
on the folder containing the Dockerfile, should be ignored, or considered (line
starting with '!'), in the container build process.
1
2
3
*
!obj/Docker/publish/*
!obj/Docker/empty/
docker-compose project, which is automatically set as StartUp Project, contains
docker-compose.yml file. The latter defines the containers which have to be started
when the application runs.
1
2
3
4
5
6
7
version: '3'
services:
  efcoredockermysql:
    image: efcoredockermysql
    build:
      context: ./EFCoreDockerMySQL
      dockerfile: Dockerfile
docker-compose.yml refers to the Dockerfile contained in the console project.
After building the application,
and copying the compilation output in obj/Docker/publish/, thanks to the files
described above, you can build and run the container from the command line just by
typing the command docker-compose up (as shown below).
PS C:\EFCoreDockerMySQL> dotnet publish .\EFCoreDockerMySQL\EFCoreDockerMySQL.csproj
Microsoft (R) Build Engine versione 15.3.409.57025 per .NET Core
Copyright (C) Microsoft Corporation. Tutti i diritti sono riservati.

  EFCoreDockerMySQL -> C:\EFCoreDockerMySQL\EFCoreDockerMySQL\bin\Debug\netcoreapp2.0\EFCoreDockerMySQL.dll
  EFCoreDockerMySQL -> C:\EFCoreDockerMySQL\EFCoreDockerMySQL\bin\Debug\netcoreapp2.0\publish\
PS C:\EFCoreDockerMySQL> Copy-Item .\EFCoreDockerMySQL\bin\Debug\netcoreapp2.0\publish\ .\EFCoreDockerMySQL\obj\Docker\publish\ -Force -Recurse
PS C:\EFCoreDockerMySQL> docker-compose.exe up
Building efcoredockermysql
Step 1/5 : FROM microsoft/dotnet:2.0-runtime
 ---> e3b41abbf6c2
Step 2/5 : ARG source
 ---> Using cache
 ---> b9164fbe106e
Step 3/5 : WORKDIR /app
 ---> Using cache
 ---> dc8b3389277a
Step 4/5 : COPY ${source:-obj/Docker/publish} .
 ---> 4ff8a44571cf
Removing intermediate container 0a696ed5881b
Step 5/5 : ENTRYPOINT dotnet EFCoreDockerMySQL.dll
 ---> Running in e75f74109286
 ---> 637957331a79
Removing intermediate container e75f74109286
Successfully built 637957331a79
Successfully tagged efcoredockermysql:latest
WARNING: Image for service efcoredockermysql was built because it did not already exist. To rebuild this image you must use `docker-compose build` or `docker-compose up --build`.
Creating efcoredockermysql_efcoredockermysql_1 ...
Creating efcoredockermysql_efcoredockermysql_1 ... done
Attaching to efcoredockermysql_efcoredockermysql_1
efcoredockermysql_1  | Hello World!
efcoredockermysql_efcoredockermysql_1 exited with code 0
You can also forget about all those files and just build and run the application
from VS. In order to do that, you just need to type F5 or select Debug -> Start
Debugging. In this case, in addition to the file just described, VS uses some
automatically generated files which allow to debug the application from the development
environment. In order to discover where those files are and their content, you can
look at the Output window of the Build process, and analyze the invocation of
the docker-compose command.
MySQL container addition
After that, I added a MySQL container and I put it on the same virtual network of
the application.
1
2
3
4
5
6
7
8
9
10
11
12
13
14
15
16
17
18
19
20
21
22
23
24
25
26
27
version: '3'
services:
  mysql:
    image: mysql:5.7.18
    container_name: efcoredockermysql-mysql
    environment:
      MYSQL_ROOT_PASSWORD: "p4ssw0r#"
      MYSQL_DATABASE: "efcoredockermysql"
    volumes:
      - ./mysql-data:/var/lib/mysql
    restart: always
    networks:
      - efcoredockermysql-net
  efcoredockermysql:
    image: efcoredockermysql
    build:
      context: ./EFCoreDockerMySQL
      dockerfile: Dockerfile
    depends_on:
      - mysql
    networks:
      - efcoredockermysql-net
volumes:
  mysql-data:
networks:
  efcoredockermysql-net:
    driver: bridge
Data model creation and EF Core addition
Then I added Entity Framework Core to the project by using the following command in the Package Manager Console:
Install-Package Microsoft.EntityFrameworkCore -Version 2.0.0
I developed a simple data model and the DbContext of EF Core.
1
2
3
4
5
6
public class Person
{
    public int Id { get; set; }
    public string Name { get; set; }
    public string Surname { get; set; }
}
1
2
3
4
5
6
7
8
public class ApplicationDbContext : DbContext
{
    public ApplicationDbContext(DbContextOptions<ApplicationDbContext> options) :
        base(options)
    {
    }
    public DbSet<Person> People { get; set; }
}
DB initialization through SQL script
Before being able to actually use the data model, the table People has to be created
in the DB. The efcoredockermysql database is automatically created at the container
start up but, as you can simply check by looking into the mysql-data\efcoredockermysql
folder, no table is created.
Even if the goal of the post is to introduce migrations, for the sake of simplicity, I decided to use a SQL script in order to create the table at MySQL container start up. In this way I can verify the correct behavior of the system before introducing more complexity with migrations. In order to do this I:
- created a
init.sqlfile into themysql-initdbfolder, the former contains the SQL instructions needed to create thePeopletable and fill it with test data; - modified the
docker-compose.ymlfile in order to map themysql-initdbfolder in the host filesystem to the/docker-entrypoint-initdb.dfolder in the MySQL container.
1
2
3
4
5
6
7
8
9
USE efcoredockermysql;
CREATE TABLE People (
    Id INT UNSIGNED AUTO_INCREMENT PRIMARY KEY,
    Name VARCHAR(255) NULL,
    Surname VARCHAR(255) NULL
);
INSERT INTO People (Name, Surname) VALUES ('Alice', 'Cooper');
INSERT INTO People (Name, Surname) VALUES ('Bob', 'Marley');
INSERT INTO People (Name, Surname) VALUES ('Charles', 'Xavier');
1
2
3
4
5
6
7
8
9
10
11
12
...
  mysql:
    image: mysql:5.7.18
    ...
    volumes:
      - ./mysql-data:/var/lib/mysql
      - ./mysql-initdb:/docker-entrypoint-initdb.d
...
volumes:
  mysql-data:
  mysql-initdb:
...
mysql client to verify the content of the DB.
Sample application
At this point, containers, DB and data model are ready. Then, I implemented an application to read and write the data in the database. In order to use EF Core 2.0 with MySQL I installed the NuGet package Pomelo.EntityFrameworkCore.MySql using the following command in Package Manager Console:
Install-Package Pomelo.EntityFrameworkCore.MySql -Version 2.0.0
I used the Pomelo library because, as I am writing the post, the official package MySql.Data.EntityFrameworkCore is still not compatible with EF Core 2.0.
The application, shown below, implements two simple operations:
- insert/update one record of
Peopletable; - show all the records in the same table.
1 |
class Program
{
    static void Main(string[] args)
    {
        var builder = new DbContextOptionsBuilder<ApplicationDbContext>();
        builder.UseMySql("server=efcoredockermysql-mysql;userid=root;pwd=p4ssw0r#;" +
          "port=3306;database=efcoredockermysql;sslmode=none;");
        AddOrUpdateDavid(builder.Options);
        ShowAllPeople(builder.Options);
    }
    private static void AddOrUpdateDavid(
        DbContextOptions<ApplicationDbContext> options)
    {
        using (var context = new ApplicationDbContext(options))
        {
            var david = context.People
              .FirstOrDefaultAsync(x => x.Name == "David").Result;
            if (david != null)
            {
                david.Surname += "*";
            }
            else
            {
                david = new Person { Name = "David", Surname = "Gilmour" };
                context.People.Add(david);
            }
            context.SaveChanges();
        }
    }
    private static void ShowAllPeople(DbContextOptions<ApplicationDbContext> options)
    {
        using (var context = new ApplicationDbContext(options))
        {
            foreach (var person in context.People)
            {
                Console.WriteLine($"{person.Name} {person.Surname}");
            }
        }
    }
}
|
It is worth noting the connection string: the MySQL container name is used as server
name. As a matter of fact Docker, when a bridge network is used, provides a DNS
service to all the containers on the same network. This service resolves names assigned
to the containers through the container_name attribute. The connection string is
passed to the method UseMySql which is provided by the Pomelo library.
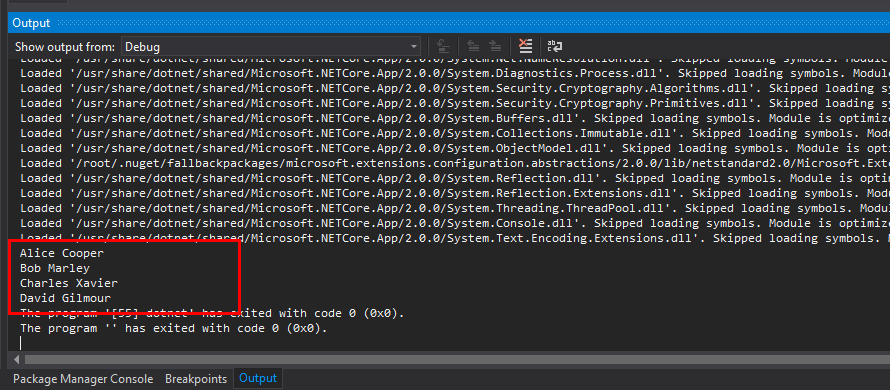
Starting the application from VS, in the Output window, you will see the following:

Note on the first execution: even if the depends_on has been used in order to specify
that the application container has to start after MySQL container is started, the
application could try to connect with the database before the latter is actually
available. This can happen since Docker ensures that containers are started in the
correct order but it cannot guarantee that the services contained within are up and
running. There are several ways to ensure this but they are out of the scope of this
post.
If, at the first execution, the application has connection issues, you can run it
again in order to solve the problem.
Using migrations
Once verified the correct behavior of the system, we finally get to the core of this post: using migrations. As it happens sometimes in software development, there is the need to step backwards in order to be able to keep going. In particular, I cancelled the changes described in paragraph DB initialization through SQL script in order to work with a clean database, i.e.:
- I removed the containers created previously by using the command
docker rm -f <id container> <id container>; - I deleted folders
mysql-dataandmysql-initdb; - and finally I removed the folder mapping of the latter from the file
docker-compose.yml.
Just to check that the DB is no more initialized, starting the application you should simply see the following error:
MySqlException:Table 'efcoredockermysql.People' doesn't exist
In order to use the .NET Core CLI for EF Core, first of all I installed the package
Microsoft.EntityFrameworkCore.Tools.DotNet. For doing it, as described in this
post,
I manually modified EFCoreDockerMySQL.csproj adding the following line:
1
2
3
4
<ItemGroup>
  <DotNetCliToolReference Include="Microsoft.EntityFrameworkCore.Tools.DotNet"
    Version="2.0.0" />
</ItemGroup>
After that, I created the class ApplicationDbContextFactory, which implements
IDesignTimeDbContextFactory<ApplicationDbContext> to be able to correctly allocate
the application DbContext when using the CLI.
In order to avoid duplication of the connection string within the source of the application,
I decided to use the standard JSON configuration files of .NET Core, i.e. the NuGet
package Microsoft.Extensions.Configuration.Json. Then I modified the main method
as shown below, and I added a configuration file.
1
2
3
4
5
6
7
8
9
10
11
12
13
14
15
16
17
18
19
20
21
22
23
...
static void Main(string[] args)
{
    var builder = new DbContextOptionsBuilder<ApplicationDbContext>();

    builder.UseMySql(Configuration.GetConnectionString("DefaultConnection"));
    AddOrUpdateDavid(builder.Options);
    ShowAllPeople(builder.Options);
}

public static IConfigurationRoot Configuration
{
  get
  {
    var environmentName = Environment.GetEnvironmentVariable(
      "DOTNETCORE_ENVIRONMENT");
    var builder = new ConfigurationBuilder()
      .AddJsonFile("appsettings.json", optional: true, reloadOnChange: true)
      .AddJsonFile($"appsettings.{environmentName}.json", optional: true);
    return builder.Build();
  }
}
'''
1
2
3
4
5
{
  "ConnectionStrings": {
    "DefaultConnection": "server=efcoredockermysql-mysql;userid=root;pwd=p4ssw0r#;port=3306;database=efcoredockermysql;sslmode=none;"
  }
}
Finally, before generating the first migration, I let the MySQL server be reachable
from the host machine, that is the development one. To do this I changed the file
docker-compose.override.yml and restarted the MySQL container.
1
2
3
4
5
version: '3'
services:
  mysql:
    ports:
      - "3306:3306"
docker-compose.yml, I am sure that changes will
not affect the release configuration.
Now that MySQL is reachable at localhost:3306, I added the following connection
string to appsettings.json and changed the ApplicationDbContextFactory class
in order to use it:
"MigrationConnection": "server=localhost;userid=root;pwd=p4ssw0r#;port=3306;database=efcoredockermysql;sslmode=none;"
1 |
public class ApplicationDbContextFactory :
  IDesignTimeDbContextFactory<ApplicationDbContext>
{
  public ApplicationDbContext CreateDbContext(string[] args)
  {
    return new ApplicationDbContext(new DbContextOptionsBuilder<ApplicationDbContext>()
      .UseMySql(Program.Configuration.GetConnectionString("MigrationConnection"))
      .Options);
  }
}
|
Once completed the arrangement described above, I opened the Package Manager Console and executed the following commands in order to create the first migration:
PM> cd .\EFCoreDockerMySQL
PM> dotnet ef migrations add InitialCreate
Done. To undo this action, use 'ef migrations remove'
Doing this the CLI of EF Core created the following files:
20171003202500_InitialCreate.cs, which contains the actual migration, bothUpandDown, that has to be applied to the DB in order to align the latter to the data model structure;20171003202500_InitialCreate.Designer.cs, which describes the expected structure of the tablePeopleonce the migration has been applied;ApplicationDbContextModelSnapshot.cs, which represents the expected structure of the whole database once the migration has been applied.
The last two files have the same role that the migration related resource files had in Entity Framework.
Then I applied the migration to the DB by typing the following command in the Package Manager Console:
PM> dotnet ef database update
Applying migration '20171003202500_InitialCreate'.
Done.
In order to verify that everything works correctly you just need to execute the application and look at the Output window.
This approach allows you to modify the data model and to align the DB schema
by simply using the commands dotnet ef migrations add and dotnet ef database update
of the CLI of EF Core. These commands are almost completely equivalent to those used
with Entity Framework: Add-Migration and Update-Database.
Conclusions
.NET Core allows to develop light and multi-platform applications. Being able to correctly use it with Docker and MySQL allows to exploit the potential of this platform at its best.
I always found really useful the code first approach to manage data model and DB schema. In this post I shown how to set a project, and the development environment , up in order to directly use migrations of EF Core with MySQL. In this way you can use, during the development cycle, the same version of the database that you would use in production.
Furthermore, with this approach, thanks to Docker, you can use different versions of framework and database for each project, without even install none of them on the host computer.
There is much more to explore about EF Core, e.g. database seeding, how to deploy migrations in production, etc. Topics worth to be deepen in future posts.
The source code related to this post is available on GitHub. Below the configuration of the development environment:
- Windows 10 Pro;
- Visual Studio Professional 2017, version 15.3.4;
- Docker Community Edition for Windows, version 17.09.0-ce-win33 (13620);
